I have to write this recipe down because we really enjoyed it, and I would love to have a reference to make it again. I also would love for you to try making it, if you think it is something you might enjoy.
We stepped outside our comfort zone this week and decided to make home made chicken stock. We have done home made turkey broth before, and something about the smell of it cooking on the stove deterred us from wanting to eat it. My sister gave us the advice to throw in a bunch of veggie trimmings and a whole head of garlic and that it will taste and smell better.
Since we did not host Christmas dinner this year, and we did not have the privilege of dealing with the leftovers, we decided to roast a whole chicken on Boxing Day. We had our supper and then I picked the meat off the bones and froze the meat. I immediately threw the chicken carcass in a soup pot with some water as well as some veggie trimmings from our Sweet Potato soup we made on Monday (ie celery, onion, sweet potato and broccoli trimmings) and some garlic. I boiled it for an hour and a half and after tasting it added a bit of salt. It wasn't bad, and the smell was not overwhelmingly chickeny, which was nice.
Here is the recipe for the stew that was our reason for making the chicken stock.
Stew
4 tbsp butter
1/4 cup flour
1 yellow onion, chopped
4 stalks of celery, chopped
4 carrots, chopped
3 red potatoes, chopped
3-4 cups of chicken stock
1 cup milk
1 tsp thyme
1/2 tsp turmeric
1/4-3/4 tsp cayenne pepper (to taste, or leave it out if you don't like spice)
salt, to taste
2 cups of cooked chicken, chopped (we had one breast and two thighs left from our roasted chicken)
1 cup frozen peas
Dumplings
1 1/2 cups flour
1/2 cup corn meal
1/2 tsp salt
1 tsp Italian seasoning
1 heaping tbsp baking powder
2 tbsp melted butter
1 1/4 cups milk
Directions:
Melt butter in a large pot/dutch oven. Add in onions and celery and saute until they start to brown. Add in thyme, turmeric and cayenne pepper. Once the spices are stirred in sprinkle in flour and stir until it absorbs most of the oil/moisture. Then add the chicken stock and stir until thick. Add milk, potatoes and carrots. Bring to a simmer and allow to cook until .the potatoes are tender, approx 20-30 minutes. Stir in the chopped chicken and frozen peas and bring to a simmer again. Allow to simmer for about 15 minutes. During this time mix up the dumpling dough. Stir the dry ingredients together then add the milk and melted butter. Allow the batter to sit for a few minutes to rest. Then make sure the stew is simmering steadily and drop spoonfuls of batter on top of the stew but do not overcrowd them because they do spread out. When you are done spooning it on top, place the lid on the top and do not remove for 15 minutes. After 15 minutes you an test the dumplings to see if they are done by poking them with a toothpick. If it comes out clean they are done.
I am pretty sure that my mom may have made dumplings once or twice when I was a kid, but I don't really remember them. I don't know why, but I expected them to be much doughier than they were They were kind of bready, like biscuits, inside and a bit doughy on the bottom from sitting in the stew. I might play around with different dumpling recipes, but the stew was so flavorful and just had a nice bit of spice from the cayenne pepper. Yum :)
Showing posts with label Recipes. Show all posts
Showing posts with label Recipes. Show all posts
Saturday, December 29, 2012
Saturday, September 15, 2012
Pizza Sauce
I am sure that Jay will write a post at some point about our awesome gluten free pizza that we made for supper tonight (since he took some great photos of it). I am here to write about the sauce that we used on the pizza. I found this recipe a while back and before I went gluten free we tried it and thought it was just great. So great in fact that we made a similar version of it tonight with gluten free crust. I knew it must be good when Jay said it was (and I quote) "the best thin crust pizza I have ever had".
I realize that not everyone wants a thai inspired pizza sauce on every pizza. However, if you would like to try a Thai pizza, this sauce is amazing!
Thai Pizza Sauce (I imagine it could be used for other purposes too....)
2 tbsp sesame oil
1 tbsp peanut butter
1/2 tsp soy sauce (I used gluten free soy sauce)
2 cloves of garlic, minced
1/2 tsp of brown sugar
1/2 tsp of chili pepper flakes (or less to taste)
Mix together and enjoy!
Thursday, September 13, 2012
Guacamole
It wasn't many years ago when I tried guacamole for the first time. It was at a restaurant and I did not care for it at all. I can't remember where it was, but all it tasted like was mashed up avocado. For those who haven't tried avocado it really doesn't have much of a taste, I would say it's more about texture. A good ripe avocado sort of has a texture similar to butter. It's very smooth and creamy and fatty. Of course they are 'good' fats, but still a lot of fat, so it's best not to overindulge in avocado or guacamole.
I am not sure what inspired me to try making it at home a few years ago. Maybe seeing a recipe online and thinking, hey, that sounds much better than that bland goop that I had at the restaurant. So I tried, and it was good. This past week avocados were on sale at Co-op for $1 each, so I decided to make some, as it is gluten free. Here is my recipe:
Guacamole
3 avocados, mashed
2 roma tomatoes, chopped finely
4 green onions, chopped finely (I would have used 1/4 to 1/2 of a red onion but we had a lot of green onion that needed to be used up)
juice of two limes
1/4 cup sour cream (I used light sour cream, not fat free)
1/4 cup cilantro, chopped
2 cloves of garlic, minced
1 tsp cumin
1/2 tsp salt
1/2 tsp chipotle chili powder (or to taste)
Add all ingredients to a bowl and stir well. Allow to chill for a few hours to let the flavors come together. Then serve with tortilla chips. YUM!
Sunday, September 02, 2012
Gluten Free Bread
I don't think that I could do this gluten free diet without access to some form of gluten free bread. I occasionally like to have toast for breakfast (maybe a little more often, now that most of my favorite cereals are off limits), and I need something to dip in my soup or put a hamburger patty on. I tried my first batch of gluten free bread last weekend and was pretty impressed with the result. It tasted much better than any of the store-bought gluten free bread I have tried. However, I did find that, as I ate it throughout the week I did notice that it was dry and rather crumbly. It makes decent toast, but was not something that I would probably make again.
I started doing some research for other gluten free bread and came across this recipe. After reading some of the reviews I made a few modifications based on my experiences so far, and it is just great. It has a nice spongy texture that wheat bread has. I am curious to see how it will toast and how it will taste when it is fully cooled and sliced. I will share the recipe with the substitutions I made.
Gluten Free Flax Bread
1 cup sorghum flour
1/2 cup brown rice flour
1/2 cup potato starch
1/4 cup corn starch
1/4 cup ground flax seed
2 1/2 tsp xanthan gum
2 tsp dry active yeast
1 tsp salt (which I realized that I forgot to add, and I think the bread could use a little salt)
2 large eggs
2 egg whites
1 cup of water or milk (I used water because we were out of milk)
2 tbsp olive oil
2 tbsp brown sugar (though next time I might use agave nectar)
2 tsp vinegar
Directions:
1) Combine flours, starches, flax, yeast, salt and xanthan gum in a bowl, whisk well.
2) Combine eggs, water or milk, oil, sugar and vinegar in the bowl of your mixer. Beat to combine.
3) Add the dry ingredients to the wet and mix until combined. Scrape down bowl then mix on medium speed for approximately 4-5 minutes.
4) Lightly grease a 5x9 loaf pan and scrape the dough into the pan. Smooth out the top of the loaf and allow to rise in a warm place until the dough reaches the top of the pan (for me this took about 70-80 minutes).
5) Preheat the oven to 350F and bake for approximately 30-35 minutes until the bread is nice and brown and sounds hollow when tapped.
6) Use oven mitts and immediately turn the bread out onto a cooling rack and allow to cool. Enjoy!
Sunday, April 15, 2012
Pizza Dough Recipe
After losing the recipe card, then almost losing the file that I had it written up in on my computer, I decided that I would add this recipe to my blog for easy access! It is a recipe that we have made numerous times since we have been married. It was given to me by Lynette at one of my bridal showers and we love it.
Easy Pizza Dough
2 tsp yeast
2 ½ cups flour (I usually do 1 1/2 cup whole wheat and 1 white)
1tsp salt
1 cup warm water
¼ cup oil
1/2 tsp garlic powder (optional)
1 tsp italian seasoning (optional)
Mix the yeast with 1 1/2 cups of flour, salt, garlic powder and Italian seasoning. Mix in oil and warm water until you have a goopy mess. Mix in the rest of the flour and add a bit more if it is too sticky, if it is too dry add a bit more water. Knead it on a floured counter top for 5 minutes or so until it smooth and elastic. Set it aside in a covered bowl to rest for about 10 minutes while you prepare your pizza toppings. This makes enough dough to make two round medium sized pizzas or one large cookie sheet sized pizza. Roll the dough out evenly and top it with your desired toppings. Bake it at 425F for approximately 25-30 minutes until the crust is browned.
Monday, February 20, 2012
Rhubarb Crisp
I know it's not rhubarb season in Saskatchewan, but my mother in law gave me some rhubarb months ago. It has sat in our freezer and I even forgot about it for a while. I figured that I wanted to do some baking with rhubarb this weekend. I started looking at muffin recipes but decided to make cranberry lemon muffins instead yesterday (they are so good!). Then I stumbled upon a rhubarb crisp recipe and my decision was made!
I did a bit of research and made a mix of two different recipes. One was for how to prepare the rhubarb for a crisp and the other was an apple crisp recipe that claimed to be the perfect apple crisp. I had saved that recipe months ago because the topping looked amazing and included pecans! I melded the two recipes and this is what I came up with:
Ingredients:
4 cups of diced rhubarb (thanks to my mother-in-law the rhubarb was cleaned and diced and in 2 cup portions!)
1 cup sugar
1 cup water
2 tbsp cornstarch
1 tsp vanilla
Topping:
1 cup rolled oats
1 cup brown sugar
1 cup flour
1/4 tsp baking powder
1/4 tsp baking soda
1 tsp cinnamon
1/2 cup melted margarine
1/2 cup chopped pecans
Directions:
Preheat the oven to 350F. Add sugar, water, cornstarch and vanilla to a pot and bring to a boil and stir until thickened. Put the rhubarb in a 9x9 greased baking pan and pour the water/sugar mixture over top. In a separate bowl, mix the oats, brown sugar, flour, baking powder and soda, cinnamon and chopped pecans. Pour the melted butter over top and mix until well combined. Pour the topping over the rhubarb and pat it level. Bake for about 40 minutes. My 9x9 was pretty full so I put it on a cookie sheet in case it cooked over, and it did boil over just a little bit. Serve warm with vanilla ice cream.
It was really good! I do really like the topping recipe and will definitely use it again for other fruit crisps. The pecans were a really tasty addition. As for the rhubarb...if you like rhubarb, I think you will like this. It is definitely sweet enough, but you get the nice bit of tartness with the rhubarb as well.
Saturday, February 11, 2012
Smokey BBQ Slow Cooker Baked Beans
In the summer we decided to try making baked beans. I came across this recipe and thought the combination of ingredients sounded really delicious! We made it and really enjoyed it and decided to try it again this weekend. The one thing that really drew me to this recipe is that it starts with dried beans. I have nothing against canned beans, but I wanted a recipe that would allow us to build our own flavor without all the additives in canned beans.
Here is our take on the recipe that I linked to above:
Slow Cooker BBQ Baked Beans
Ingredients:
1lb dried beans, soaked in about 3 times as much water overnight, then drained (we used a mix of kidney and pinto beans, and next time I would use smaller beans, as the kidney beans seemed to take FOREVER to cook)
14oz can crushed tomatoes
1/2 diced onion
2 tbsp yellow mustard
2 tbsp molasses
2 tbsp balsamic vinegar
1/4 cup maple syrup
1.5 tbsp brown sugar
1.5 tbsp worcestershire sauce
2 tsp garlic powder
1 scant tsp chipotle chili powder
2 tsp cumin
1/2 tsp allspice
salt to taste (I added close to 1tsp because the chicken stock and tomatoes I used have little to no salt added)
2 cups chicken stock
1/2 pound of bacon cooked and diced (we used turkey bacon the first time, and it was fine, this time we didn't do any meat, and it felt like it was lacking a little bit, next time I would like to try the pork hock that the original recipe calls for and try doing them in the oven)
Mix up sauce and spices and pour over beans, bacon and onion in the slow cooker. We ended up cooking ours on low for about 4 hours then on high for another 3.5 hours. When we were ready to eat the sauce was still a bit runny, so I scooped out some of the sauce and mixed it with a heaping tablespoon of cornstarch and poured it back in to thicken the sauce, and it worked perfectly.
We ate our supper and the beans were good, but still not as cooked as we like. After supper I turned the slow cooker back on high for about 2 more hours. I don't recall having this trouble with the kidney beans the first time we made this, but definitely next time we will stick with pinto or navy beans, which seemed to cook faster.
I really love the sauce that this recipe makes. It may sound like an odd combination of ingredients, but the sauce that you end up with is a thick, dark, rich BBQ sauce. It is sweet and tangy and the chipotle adds a nice bit of spicy kick.
Sunday, October 16, 2011
Cranberry Pork Tenderloin
I do not aim to turn this into a food blog, but I enjoy sharing delicious recipes and this one rates right up there with one of our finest. We first tried this recipe when we went to Dinner Rush with some friends a couple of years ago. Of course we didn't have access to the precise recipe, but we did our best to remember what we could and I think we came up with a fine subsitute.
At Dinner Rush it was made with dried cherries, which were nice, but are a little pricey. We decided to try it with craisins this time and honestly I didn't notice a difference in the taste at all. So I think I would stick with craisins, but really, I am sure you could use other dried fruit too if you wanted. We made 3 tenderloins for supper last night, feel free to modify the quantity of sauce if you only make 1 or 2. I would maybe reduce the sauce and seasoning by half if doing 1 or 2 tenderloins.
Cranberry Pork Tenderloin
3 pork tenderloins
1-2 tbsp oil
1/2 red onion, chopped finely
3/4 cup craisins
2 cups red wine (any variety is fine, we used pinot noir that Jay's dad made)
1/4 cup balsamic vinegar
1 tsp soy sauce
1 tsp garlic powder
2 tsp garam masala (or subsitute a mixture of cinnamon, ginger, cardamom, pepper, etc)
Preheat the oven to 350F. Heat oil in a frying pan and sear the outside of the tenderloins until they are nicely browned. Place them in a 9x13 baking dish. Saute the onions until soft then pour in the wine, balsamic vinegar, soy sauce, craisins and spices. Scrape the bottom of the pan to loosen any nice brown bits from searing the pork. Simmer the sauce until it reduces a little and the craisins plump up. Pour the sauce over the pork tenderloins and cover with foil. Place in the oven and cook until the pork is done, approx. 30 minutes. Allow the pork to stand for 10 minutes before slicing it. Then slice it and serve it with onion and cranberries and sauce drizzled over top.
I have to give a plug to our digital meat thermometer. I have come to really enjoy pork tenderloin, however, it is easy to over cook and then it is dry and blah. I recommend a digital thermometer that you can leave in the piece of meat as it cooks so you know precisely when it is done so you never have to eat dry, overcooked meat again. They also work great for turkey! Never have dry white meat again! The one we are using was only about $25 from Superstore too. A small investment to have amazing meat :)
Wednesday, October 12, 2011
A perfect meal for a cool autumn day
They had some huge and nice looking cauliflowers at Superstore last week and we picked one up. After cutting it up we weren't sure if we would be likely to eat the whole thing as is, so we had the great idea to try to make some soup out of it.
I looked at a number of recipes and chose bits and pieces of a few different ones. When we made the soup last night and I tasted it, it was okay, but not spectacular. Jay warmed it up for supper tonight and like magic the flavors really came out. It was a perfect match with some nice spicy cheddar jalapeno bread from Hot Racks (the new local bakery).
Creamy Cauliflower Soup
2-3 tbsp butter
1 large onion, chopped
1 1/2 green peppers, chopped
5 cloves of garlic, minced
4 cups chicken broth
2 cups milk
3 medium sized potatoes, cubed
1 large head of cauliflower, cut into florets
2 bay leaves
1 tsp thyme
1 tsp celery salt
1 tsp dried parsley
2 tsp dijon mustard
salt and pepper to taste
pinch of red pepper flakes
Directions:
Saute the onion and green pepper in butter until soft. Add the chicken broth and milk then add the garlic. Add the bay leaves, thyme, celery salt, parsley, dijon mustard, salt, pepper and pepper flakes. Add the potatoes and cauliflower. Bring to a simmer and cook until the potatoes and cauliflower are soft, about 30 minutes. Discard the bay leaves then puree the soup using an immersion blender or in small batches using a stand blender. Depending on your preference, blend until smooth, or leave some chunks of vegetables.
The reason we used green pepper is because it was in the fridge and we didn't want it to go bad before we had a chance to use it. If I were to make the soup again I would probably add some celery for flavor, though I think the celery salt did a fine job adding flavor. I loved the texture of the pureed soup, and specifically the potato gave the soup a nice creaminess without the added fat of using cream.
Wednesday, September 21, 2011
Spicy Lentil Dal
We have increasingly found ourselves drawn to east Indian/Pakistani type food. I think it may have started with my first trip to Mogul Divaan (a locally owned Pakistani restaurant in Saskatoon). The food is so flavorful and spicy and not like anything I have eaten before. I think in some ways it is a bit of an acquired taste. I recall thinking curry was pretty gross when I was younger. I also remember trying a certain PC Blue Menu frozen dinner a few years ago called Chicken Tikka Masala and thought it was just awful. I don't know exactly what spices were in it, but there was definitely a taste of cinnamon/nutmeg and it was spicy. It was an odd combination to my palate and I didn't try it again until recently, and now I love it!
I have opened my mind a little now to different flavors. After really enjoying making lentil soup last winter and trying some dal at Mogul Divaan we thought we would dive in with both feet (bought a 5lb bag of lentils) and try some recipes. Our first attempt was spicy lentil dal. I started with this recipe as a base and made a few modifications based on what we had on hand.
Spicy Lentil Dal
1 cup green lentils
4 cups chicken broth
5 green onions chopped finely (we would have used a white or yellow onion, but were out!)
1 tbsp fresh ginger, minced finely
2 cloves of garlic, minced
2 tsp cumin
2 tsp garam masala
1 tsp ground coriander
1/2 tsp cayenne pepper (adjust to taste)
1 tsp salt
2 tbsp tomato paste
We opted to cook our dal in the slow cooker. I rinsed the lentils and added them to the crockpot with the chicken broth. I added the spices and tomato paste to the crockpot and stirred it all up. We sauteed the onion and garlic and ginger, though because did use the crockpot I think that this step was unneccesary. We prepared this the night before and put it in the fridge over night. We then let it cook for 8-9 hours on low. Jay kept an eye on it and took the lid off for 45 minutes or so to let some of the liquid cook off. I think the consistency is up to whoever makes it. If you want it soupier add more liquid, or leave the crockpot lid on. Less liquid, let some cook off. Ours was nice and thick, just the way I hoped it would be! I also found that 1/2 tsp of cayenne pepper was the perfect amount for us. We served the dal over rice, and I think to just eat it on it's own it might have been a little too spicy for my tastes, but with rice it was perfect. We will definitely be making that again!
Monday, August 29, 2011
Corn Bread
I have wanted to try making corn bread (or cone breyed as we like to call it around here) for quite a while. I just never felt like I had a good reason to make it, and I always forgot to buy corn meal. We planned to make beef stew for supper tonight and I thought this would be a good opportunity to try making some corn bread on the side. I was impressed with how easy it is to make. I chose to use a recipe I found online and as per the suggestions in the reviews, I cut back on the amount of sugar the recipe called for. I think that corn bread should have some sweetness, but I think I may have used too much because as we were eating supper, Jay commented that it kind of felt like he was eating a cupcake with his stew. I think next time I make it (to go with soup or chili or something) that I would really cut back the sugar and maybe go for a more savory corn bread. Maybe add some cheese, or some chili powder or diced jalapeno peppers. I love trying new recipes :)
Saturday, March 26, 2011
Ground Turkey Enchiladas
I have wanted to try making enchiladas for a while. We tend to really enjoy Mexican or TexMex food, so I thought they would be right up our alley. They didn't disappoint! They were awesome!

My concern in reading a number of recipes and reviews of recipes was that they would turn out too saucy/soupy and that the tortillas would be soggy and gross. I read through a number of recipes and ended up making our own version. I have no idea how authentic they are, but we will certainly be making them again sometime!

I wanted to write down the recipe so we don't forget anything, and so that if there is anyone out there who would like to try our version, they can do so.
Ingredients:
1 lb lean ground turkey
1 onion, diced
1 red pepper, diced
1 can of black beans, drained and rinsed
1 cup frozen corn
1 tbsp chili powder (the stuff we have isn't very spicy, so we used quite a bit)
2 tbsp cumin, divided
3 cloves of garlic
8 flour tortillas (small to medium size)
1 can of tomato sauce
1/2 tsp chipotle powder
1 can diced green chilies (we used Old El Paso ones, and I don't know that they added much in the way of flavor or spice, so we might forego them next time)
1/2 tsp garlic powder
1 tsp salt (I bought the tomato sauce without salt, and it needed some)
1-2 cups of shredded cheddar cheese
Directions:
Preheat the oven to 400F. Fry the ground turkey, onion, red pepper and garlic until turkey is cooked. Add chili powder and 1 tbsp of cumin to the meat mixture. Add in the black beans and corn and cook until corn is thawed. Meanwhile, add tomato sauce, cumin, chipotle powder, garlic powder and green chilies (if you are using them) to a small sauce pan and heat until simmering to slight reduce the sauce. When the sauce is heated through and slightly reduced add half a cup to the meat mixture. Shred the cheese.
Spray a 9X13 inch pan with non stick spray. Microwave the tortillas on a plate for 20-30 seconds to warm them up and make them pliable. Put 1/4 to 1/3 of a cup of meat mixture on a each tortilla and roll it up and place it seam side down in the pan. Repeat for as many tortillas will fit in your pan. Lightly spray the top of the tortillas with nonstick spray and place in the oven for about 7 minutes until the tortillas start to brown slightly. Take the pan out and pour the remaining sauce over top of the tortillas and top with shredded cheese. Put the pan back in the oven for twenty minutes until the cheese starts to brown. Take out and let stand for 5-10 minutes before serving.
Monday, February 28, 2011
Baking Bread
I love food blogs, and I don't think I will ever have a food blog, but I made bread today and I wanted to document the process with some photos.
First of all I got all of the ingredients out and placed them on the counter in a very photogenic manner.

Next, I took the bowl from my mixer and put a heaping tablespoon of yeast, 2 1/2 cups of warm water and two tablespoons of brown sugar in it to proof. I let it stand for 10 minutes until it gets foamy like this next photo.

I then stir in an egg, 2 tbsp of olive oil, 2 tbsp of molasses, a tsp of salt, 1/3 cup of ground flax seed, 1 cup multigrain cereal, and three or four cups of whole wheat flour. I stir it with a spoon until it is too tough to mix then use the dough hook and the KitchenAid Mixer.

I thought this was a fun picture of the mixer in action! I keep adding flour until I am left with a nice ball of dough that isn't too sticky. Usually I end up adding about 6 1/2 cups of flour in total. I typically add about 4-5 cups of whole wheat flour and the rest white flour. I let the mixer 'knead' the dough for about 5 minutes or so.

Next I pour a little olive oil in the bowl and roll the ball of dough around until the whole thing is coated in oil.

I then cover the bowl with plastic wrap and put it in a slightly preheated oven (turn the oven on to 200F for a couple of minutes then turn the oven off) to rise for 40-50 minutes until doubled in size.

I am always amazed when I go back to check on the dough and find this overflowing bowl. Then I punch the dough down (which is super fun!) and divide it into two relatively equal portions to make two loaves of bread. I have also made buns at this point by dividing the dough into small bun sized portions.

To form the loaves, I roll the dough into a long oval like this then tightly roll it into a loaf shape by tucking in the ends as I roll it.

Place the loaf in a loaf pan and cover with plastic wrap and allow to rise again for 30-40 minutes.

This is how it looks after it has risen the second time. At this point I preheat the oven to 350F and put them in to bake for 30 minutes.

There is nothing quite like the smell of baking bread. It smelled soooooo good in here this afternoon. I never got around to taking a picture of the bread after it was baked, but it looks a lot like this last photo but with a sun tan :)
Sunday, January 23, 2011
Curried Lentil Soup
There is a small cafe next door to the office where I work. After nearly six years of working there, I have to say that she makes good food, but some days I am tired of her offerings. She used to be a little more adventurous, but I feel like maybe she has fallen into a bit of a rut with her menu. She mainly offers home made soups (usually two different ones) and sandwiches, but also will do some burritos, wraps, pita pizzas, grilled cheese, denver sandwiches, etc. My favorite soup that she makes on a semi-regular basis is curried lentil and yam soup. It is nice and spicy and very flavorful. I don't know what she all puts in it, but I decided that I wanted to try and duplicate her recipe at home.
A while back I bought a bag of dried lentils to use when I attempted to make her soup. I decided that this weekend would be the time to try it. I decided to make a pot of soup to freeze in individual portions for easy lunches or suppers when needed. I looked online at quite a few recipes and decided to loosely follow this one, but made a few tweaks of my own.
I am having some for supper tonight, and I have to say it is delicious. I am usually one who likes to have some meat in my soup, or at a meal, and I don't even miss the lack of meat in this soup. Lentils are quite high in fibre and protein, so the soup is always quite filling. I just looked up the nutritional info for lentils online and I see that a cup of cooked lentils contains 16 grams of fibre, 18 grams of protein and 37% of your daily recommended intake of iron. Not a bad thing to add to a person's diet!
Here is my adaptaion of the recipe I linked to above:
Curried Lentil Soup
1 tbsp olive oil
1 medium sized onion, chopped
3 stalks of celery, chopped
4 cloves of garlic, minced
1 tbsp grated fresh ginger
4 cups chicken broth (I used Epicure's chicken boullion with 4 cups of water, it is free of MSG and is really low in sodium, I highly recommend it!)
1 - 28oz can diced tomatoes
1 small yam, peeled and diced
1 1/2 cups dry green lentils
2 kaffir lime leaves
lemongrass (I used the stuff from Epicure, about 6 little pieces)
1 tbsp red curry paste (It's not very spicy, so I also added about 1/2 tsp of chili flakes)
1 tsp cumin
1/2 tsp ground coriander
1/2 cup coconut milk
Directions:
Saute onion and celery in oil until translucent. Add ginger and garlic and saute for a couple of minutes until fragrant. Add chicken broth and tomatoes and bring a to a boil. Add lentils and yam. Add lime leaves, lemongrass, curry paste, cumin and coriander. Let simmer for 30 minutes or until yam and lentils are cooked. Stir in coconut milk and let simmer for an additional 10 minutes. Allow soup to cool somewhat, then scoop half of the soup into a blender and puree. Add back to the pot of soup to thicken the soup. Enjoy!
I think the only thing I would change, is that I would add some fresh cilantro maybe at the same time as the coconut milke, or maybe even puree it with the soup in the blender. I think that would add a really nice flavor. I have to say that this soup tastes a fair bit different than the stuff at the cafe, but I like the flavor and I will enjoy this soup until it is gone!
Friday, November 12, 2010
Baking up a storm!
I have been going a little crazy with baking lately. This week alone I made chocolate chip cookies, peppernuts, multigrain buns and lemon bars. Fortunately, most of the cookies, peppernuts and buns made it into the freezer before I could sample too many of them. The lemon bars are for dessert for supper tomorrow.
We are making a practice turkey so we will know exactly how to make our Christmas turkey perfect (we are hosting my family, all 16 of them, again this Christmas). I must admit that I spend a bit of time each day reading recipes from the website Tastespotting. On occasion I will bookmark a recipe and come back to it if we are looking to try something new. In one of my sessions, I came across the concept of brining a turkey. I did some more research into it and decided I wanted to try it because I had read that it makes the turkey juicy and tender and delicious. I was informed by a client at work that they sell a brining kit at Costco, so last time we were out there I picked one up. The kit included a bag of sea salt with seasonings in it, a gigantic brining bag (for a turkey up to 24lbs!) and a spice rub to put on the bird before you roast it. Today I brined the turkey for eight hours. I just rinsed it and put it back in the roaster in the garage to await the oven tomorrow afternoon. With the turkey we are having some of my fresh home made buns and an Asian cabbage salad. We decided we didn't need to do a big turkey dinner for just the three of us, so that is the menu we settled on.
I decided I wanted to have something for dessert, since we had invited a friend to join us for supper. When I stopped today to pick up some bean sprouts for the salad (that I forgot to buy the other night) I saw some fresh lemons and felt inspired to make something lemony. I have to confess that I am not a lover of lemons. I would say in most instances I prefer lemon as more of a savory flavor than a sweet one. The exception of course is lemon meringue pie...yum!
I only bought two lemons because I didn't have any specific recipes in mind. When I came home I thought about the frozen tart shells I have, and thought about making lemon curd to go in them, but I didn't have nearly enough lemons or eggs, so I scratched that. After probably spending a good hour sorting through lemon recipes on Tastespotting, I narrowed it down to blueberry lemon crumb bars (which I would probably make with saskatoon berries since I still have some in the freezer from the summer) and lemon bars. I decided to go withe the lemon bars. After they were baked and cooled I decided we should probably taste them to make sure they weren't gross before feeding them to our guest tomorrow. I was pleasantly surprised. They don't look quite as pretty as the ones that are on the website, however they taste like a thin layer of lemon pie filling on top of a nice firm, crispy/flaky shortbread crust.
I have been amazed by a few recipes that we have made that call for lemon zest. It is chock full of delicious lemon flavor. I think it tastes even better and more pleasant in recipes than even the fresh lemon juice does. On the other hand I have tried making muffins with orange zest and I don't care for the taste of it. Not sure if I have ever done lime zest, but I think I would like that too. Mmm, I bet those lemon bars would be awesome as lime bars. Oooh, I will have to keep that in mind for next time!
I have really been enjoying baking, but I have to say I need to get back to working out regularly or these extra calories are going to start sticking to places I don't want them!!
Sunday, October 31, 2010
Brown Bread Recipe
I have tried my hand a few times in the last year at baking bread. I have mostly done partially whole wheat bread, I think I have only done white bread once. I am not sure why I haven't made fully whole wheat bread yet, but I haven't run across too many recipes for 100% whole wheat bread. After trying a few recipes and not loving any of them, I put a request out on Facebook for anyone who was willing to share a good tried and true whole wheat bread recipe. My cousin Lori said she would send me her recipe which was her mother-in-law's (my aunt Judy's recipe), which they had rewritten to make two loaves of bread (I think the original made 6 loaves).
I am pleased to say that I have really been enjoying baking bread. Even with my couple of flops (undercooked loaves my first attempt, then a couple of batches of burned buns....), I am enjoying it. I love to mix it up then put it somewhere and check back on it and find that it has risen well. I think punching the dough down is fun and watching it deflate. I like forming loaves of bread and baking them until they are beautiful golden brown with a light crispy crust. Yum!
I am going to share the recipe, and some ideas for possibly changing it up in the future. The recipe came to me with a list of ingredients and a temperature and time for baking, but no directions of how to assemble it. I took my previous experiences and was able to make some pretty looking bread, and I have to say it tastes good too!
Wheat Bread
Yield: 2 loaves
Ingredients:
1 heaping tbsp dry active yeast
2 tbsp sugar
2 1/2 cups warm water
2 tbsp oil
2 tbsp molasses
1 tsp salt
1 egg, lightly beaten
1/3 cup ground flax seed
3 cups whole wheat flour
3 to 3 1/2 cups white flour
Directions:
Mix yeast and sugar into warm water and let stand for about 10 minutes until it is frothy. Add oil, molasses, salt and egg. Stir in flax and whole wheat flour. Stir in white flour 1/2 cup at a time until you have a dough that is not too sticky. Knead dough on a lightly floured surface for 8-10 minutes until it is smooth and elastic (or use a Kitchen Aid mixer to do all the mixing and kneading for you). Once you are done kneading, put the dough into a lightly oiled bowl and turn to coat it with oil. Then cover the bowl (I use a piece of wax paper and a tea towel, because one time I just used a tea towel and the dough stuck to it really bad!) and put it in a warm place to rise for 45 minutes to 1 hour until it's doubled. Punch it down and form the dough into loaves and put them in greased loaf pans and cover them and let them rise for another 45 minutes. Then preheat the oven to 350C and bake for 30 minutes or until the bread sounds hollow when you tap it. Turn it out onto a cooling rack immediately to cool.
I think that when I make it again at some point I am going to experiment with putting more whole wheat flour and less white flour in it. I really do like 100% whole wheat bread and I know it's better for you that way. I would also like to play with adding some other whole grains to it. I love multi-grain bread and I think it would be a lovely thing to try.
A trick that I read about for allowing bread to rise quickly and efficiently is to turn on your oven to about 200F for about a minute or so, just until the oven heats up a little bit. Then turn it off and put your bowl of dough in there to rise. I also recently heard someone mention they put their dough in the dishwasher shortly after it had been run and emptied out. So it was still nice and warm inside. I think you need to be careful that you don't put it in a place that is too warm, so it doesn't kill the yeast.
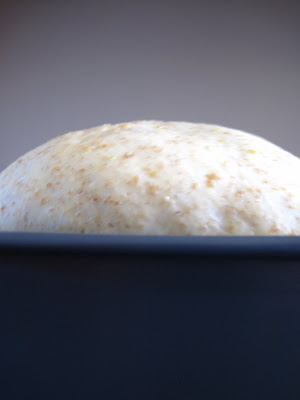
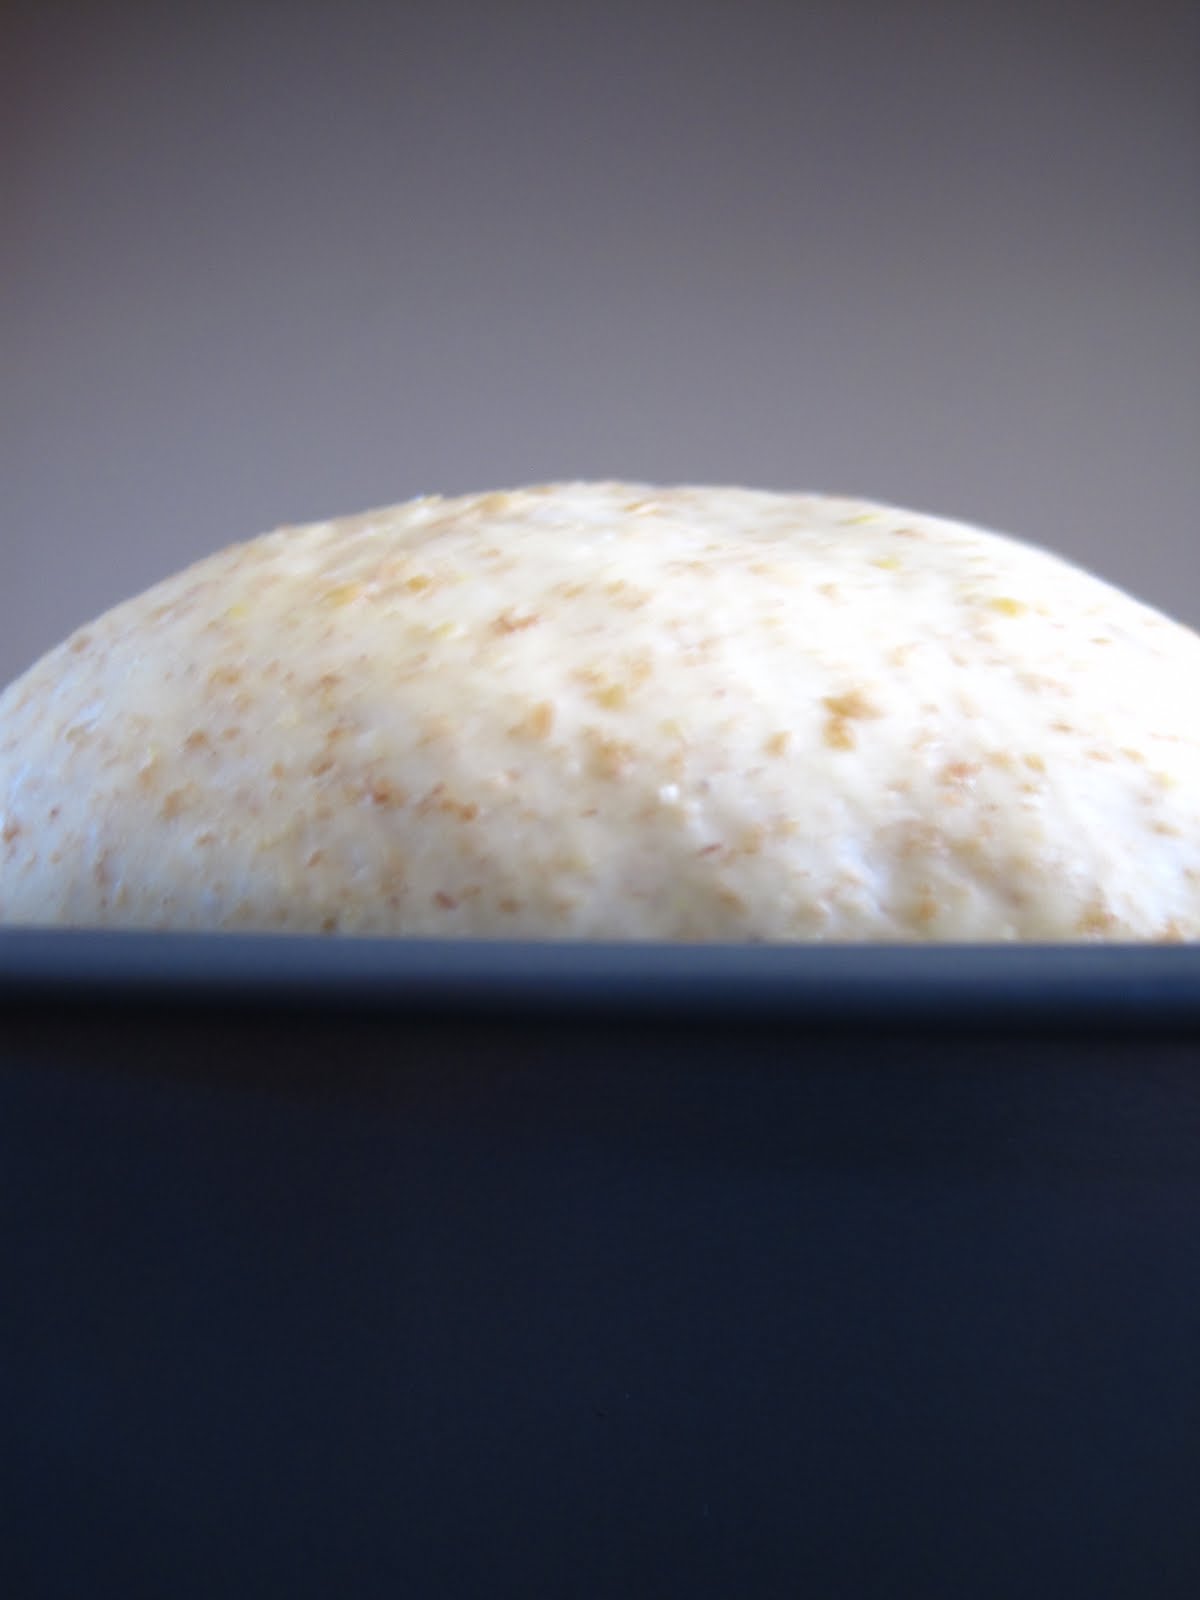
I took a couple of pictures as I made the bread so you could see how pretty it looked. The first two are just before I put it in the oven to bake. When I put the dough in the pans, before the second rising time, the dough didn't even touch the sides or ends of the pan. After rising it was about an inch above the pan.

I know the next one is blurry, but I liked the way it showed the height of the dough.
And a finished loaf, hot out of the oven! Yum!

I am pleased to say that I have really been enjoying baking bread. Even with my couple of flops (undercooked loaves my first attempt, then a couple of batches of burned buns....), I am enjoying it. I love to mix it up then put it somewhere and check back on it and find that it has risen well. I think punching the dough down is fun and watching it deflate. I like forming loaves of bread and baking them until they are beautiful golden brown with a light crispy crust. Yum!
I am going to share the recipe, and some ideas for possibly changing it up in the future. The recipe came to me with a list of ingredients and a temperature and time for baking, but no directions of how to assemble it. I took my previous experiences and was able to make some pretty looking bread, and I have to say it tastes good too!
Wheat Bread
Yield: 2 loaves
Ingredients:
1 heaping tbsp dry active yeast
2 tbsp sugar
2 1/2 cups warm water
2 tbsp oil
2 tbsp molasses
1 tsp salt
1 egg, lightly beaten
1/3 cup ground flax seed
3 cups whole wheat flour
3 to 3 1/2 cups white flour
Directions:
Mix yeast and sugar into warm water and let stand for about 10 minutes until it is frothy. Add oil, molasses, salt and egg. Stir in flax and whole wheat flour. Stir in white flour 1/2 cup at a time until you have a dough that is not too sticky. Knead dough on a lightly floured surface for 8-10 minutes until it is smooth and elastic (or use a Kitchen Aid mixer to do all the mixing and kneading for you). Once you are done kneading, put the dough into a lightly oiled bowl and turn to coat it with oil. Then cover the bowl (I use a piece of wax paper and a tea towel, because one time I just used a tea towel and the dough stuck to it really bad!) and put it in a warm place to rise for 45 minutes to 1 hour until it's doubled. Punch it down and form the dough into loaves and put them in greased loaf pans and cover them and let them rise for another 45 minutes. Then preheat the oven to 350C and bake for 30 minutes or until the bread sounds hollow when you tap it. Turn it out onto a cooling rack immediately to cool.
I think that when I make it again at some point I am going to experiment with putting more whole wheat flour and less white flour in it. I really do like 100% whole wheat bread and I know it's better for you that way. I would also like to play with adding some other whole grains to it. I love multi-grain bread and I think it would be a lovely thing to try.
A trick that I read about for allowing bread to rise quickly and efficiently is to turn on your oven to about 200F for about a minute or so, just until the oven heats up a little bit. Then turn it off and put your bowl of dough in there to rise. I also recently heard someone mention they put their dough in the dishwasher shortly after it had been run and emptied out. So it was still nice and warm inside. I think you need to be careful that you don't put it in a place that is too warm, so it doesn't kill the yeast.
I took a couple of pictures as I made the bread so you could see how pretty it looked. The first two are just before I put it in the oven to bake. When I put the dough in the pans, before the second rising time, the dough didn't even touch the sides or ends of the pan. After rising it was about an inch above the pan.

I know the next one is blurry, but I liked the way it showed the height of the dough.
And a finished loaf, hot out of the oven! Yum!

Sunday, March 07, 2010
Cheesy Herb Tortellini
I just have to share this recipe. It is SOOO good! For one of my wedding showers the people in attendance were asked to bring a couple of favorite recipes to pass on to me. This one was from my sister. We made it for the first time a month or two ago and right away agreed that it would be finding a place in our regular rotation.
We followed her recipe to get a basic outline, but we added a lot of extra vegetables and we added meat to it.
Ingredients:
We followed her recipe to get a basic outline, but we added a lot of extra vegetables and we added meat to it.
Ingredients:
- approx. 3 cups of cooked tortellini (or whatever pasta you would like to use, the original recipe called for fettuccine)
- 1 tbsp olive oil
- 2 crushed garlic cloves
- 1 tsp each, dried oregano and basil
- 2 tsp chili pepper flakes (we used less than this and it still had a bite to it, so leave them out if you don't like spice)
- 1 cup chicken broth
- 1/3 cup white wine (can substitute water)
- 36 small snow peas
- 1 red pepper, sliced
- 1/2 cup parmesan cheese
- 1/2 cup crumbled feta cheese
- OPTIONAL: meat of some variety (the first time we did boneless skinless chicken thighs cut into small pieces and this time we tried ground turkey)
- Boil pasta until barely tender, drain and rinse with hot water.
- Cook meat until well done and set aside.
- Cook in a pot over medium heat: oil, garlic, basil, oregano and pepper flakes for 3 minutes. Add chicken broth and wine (or water) and let boil for 3 additional minutes.
- In a 3L casserole dish (we use our dutch oven, and my sister said she uses a small roaster, make sure it's a big enough container because it makes a large quantity) toss broth mixture with meat, noodles, vegetables and cheese.
- Bake covered at 350F for 25 minutes. Remove the lid, stir and let cook for another 10 minutes.
- Enjoy!
Sunday, January 31, 2010
Great Soup Recipe
For a long time I have been interested in the idea of making tortilla soup. I didn't know exactly what that would entail, but I like Mexican spices like cumin and cilantro and cayenne pepper. I don't know how 'authentically Mexican' this recipe is, but we LOVED it. And Jay doesn't usually like soup. He finds that usually it is not satisfying, that it leaves him hungry. This soup was very hearty and thick, almost like a stew. I would like to share the recipe, then this way I have access to it if I am away from home and want to make it. I started with this recipe and made some adjustments to make it more to our tastes.
Chicken Tortilla Soup
Ingredients:
2-3 tablespoons of olive oil
3 handfuls of tortilla chips, crushed (the recipe called for 8 corn tortillas, so I got some from the grocery store, however when we opened them up to chop them up they were moldy, so we threw them out and used corn tortilla chips, the tortillas break down as the soup cooks and thicken it)
1/2 cup chopped cilantro
1 medium onion, chopped
4 cloves of garlic, minced
2 celery sticks, chopped
1 jalapeno pepper, seeded and minced
1 28 oz can of diced tomatoes
1 tablespoon ground cumin
1 tablespoon chili powder
7-8 cups chicken stock
1 cup frozen corn
1 can black beans
1/2 teaspoon cayenne pepper
1 red bell pepper, chopped
2 cooked and shredded chicken breasts
Garnishes
Fresh limes
Sour cream
Tortilla chips
Diced avocado
Shredded cheese
Directions:
1. Heat oil in a dutch oven over medium heat.
2. Add the tortillas, garlic, onion, cilantro jalapeno and celery and cook for 2-3 minutes.
3. Add the tomatoes and bring to a boil.
4. Add cumin and chili powder.
5. Add chicken stock and return to a boil.
6. Add frozen corn and black beans.
7. Reduce heat, add cayenne pepper and simmer for 30 minutes.
8. Add shredded chicken and red peppers and simmer for an additional 20 minutes.
9. Garnish soup with shredded cheese, sour cream, fresh lime juice, and crushed tortilla chips.
This is how we made it yesterday, the only thing I would do differently next time is to leave the cilantro out and use it as a garnish at the end. I didn't find we could taste a lot of cilantro in the soup after it cooked for an hour or so. Otherwise it as absolutely delicious!
Thursday, October 16, 2008
Spring Roll Recipe
I am going to attempt to post the recipe from the spring rolls I made the other night (at the request of Jyl). I have not received the actual recipes from Sous Chef yet, but I recreated them to the best of my knowledge and they tasted good, so I must have done it right.
Ingredients (I can't say how much of each I used really, just the right amount that looked or tasted right):
rice wrappers (I have seen them at Superstore, but got them from a Chinese grocery store this time)
vermicelli noodles
uncooked peeled shrimp (or chicken, pork or beef, or whatever meat you might like to have)
bean sprouts
carrots, shredded
fresh mint leaves (I didn't know where to get these, so I used cilantro which was good too)
fresh lime juice
fish sauce
sugar
Directions:
Start a pot of water boiling and in the meantime shred some carrots, wash some bean sprouts, peel shrimp if necessary. Once boiling put noodles in water until cooked (vermicelli cooks very quickly). Take out and run under cold water to cool. Put more water on to boil. While that is heating up, drain and cut up noodles (scissors work well). Add shredded carrot to noodles and mix up. Add juice of at least one lime (more if you like it limey-er) some fish sauce and some sugar until it tastes good. You could add more or less of each, or something completely different it is totally up to your tastes. Once the second pot is boiling throw in the peeled, raw shrimp for a few seconds until they turn pink and are cooked. Scoop them out and put them into a bath of ice water to stop the cooking and to chill them. Once cooled cut each shrimp in half (lengthwise) so they are thinner and easier to roll (and fewer shrimp go further). Now you should be ready to set up an assembly line. Take a rice wrapper and dip it in a bowl of warm/hot water until somewhat pliable and lay down on a cutting board. (I used two wrappers for each because a lot of them have holes or cracks in them) Put 3 or 4 shrimp on the wrapper about 1/3 of the way up from the bottom. Put some noodles on top, add a few bean sprouts, then put a couple of mint leaves (or cilantro leaves) on top of that and roll up. It may take a few tries to get it right because the rice wrappers are a little tricky. Repeat until you run out of ingredients. I just made them until I ran out of shrimp (I think I made about 10-12 rolls). You could make them vegetarian if you like, or like I said any meat you would prefer as long as you slice it thin.
I also made peanut sauce to go with them. I used this recipe and it was okay. I will admit that you would probably be better off buying some natural unsweetened peanut butter because the sauce was quite sweet. I didn't use coconut milk, just extra water and it was quite runny. The flavor was okay, but I might look for a different recipe next time.
Sunday, August 24, 2008
Angie's Yummy Spinach Dip
I love having excuses to make this dip. I was asked a couple of times today for the recipe. I thought I would post my take on the recipe. I found the original online and it claimed to be the same recipe as Kelsey's uses for their spinach dip. I disagree that it is their recipe, but great nonetheless.
8oz cream cheese
3/4 tsp garlic powder (non garlic salt)
1/3 cup of shredded 4 cheese blend (I usually use the President's Choice Italian 4 cheese blend)
1/4 of a red pepper finely chopped (or more or less if you want)
1 or 2 green onions finely chopped
1/2 package frozen spinach (thawed and squeezed dry)
1/2 cup of shredded cheese to melt on top
pinch of cayenne pepper
Directions:
Preheat oven to 400F.
Mix cream cheese, garlic powder, cayenne pepper and shredded cheese with hand mixer. Add green onion and red pepper and blend on low until just mixed. Add spinach and blend on low until just mixed.
Transfer into oven safe dish and sprinkle 1/2 cup of shredded cheese on top.
Bake uncovered for 15-18 minutes or until cheese bubbles around the edges.
Let stand for 5-7 minutes before serving. Serve with tortilla chips or pita chips (from Costco).
I usually double this recipe for gatherings. According to the recipe a single recipe serves four.